
Writing tests is a critical part of our iOS development process at Handshake. Every day we have multiple iOS teams updating the codebase for the app at a high velocity, so it’s imperative to have confidence that any given change doesn’t result in a regression, which can impact user experience.
At Handshake, our test suite on iOS consists of a mix of traditional unit tests using XCTest, traditional UI tests using XCUITest that validate only the core flows, and something known as snapshot tests, which validate that the pixels haven’t changed on any given screen or UI component.
What is a Snapshot Test?
While unit tests mainly verify that individual methods are doing what they are supposed to and UI tests mainly verify that screens are functioning as intended (e.g. accessibility elements are present and tapping a button does what it’s supposed to), snapshot tests ensure that the UI elements look the way they are supposed to.
A snapshot test works by performing a pixel-based comparison of two images: a reference image and a candidate image. The reference image is a screenshot of the expected state of the UI, and the candidate image is a screenshot of how the UI looks with the most recent code changes applied. If the pixels match between the two images within a given threshold, the snapshot test will pass and if they don’t match within that threshold, the test will fail.
Typically if a test fails, a snapshot testing implementation will provide a diff image that shows the pixels that are different between the two images. If a test fails but the developer intended for that UI to change, there is typically a step involved in the development process to update the reference image with the candidate image for subsequent runs to use moving forward.
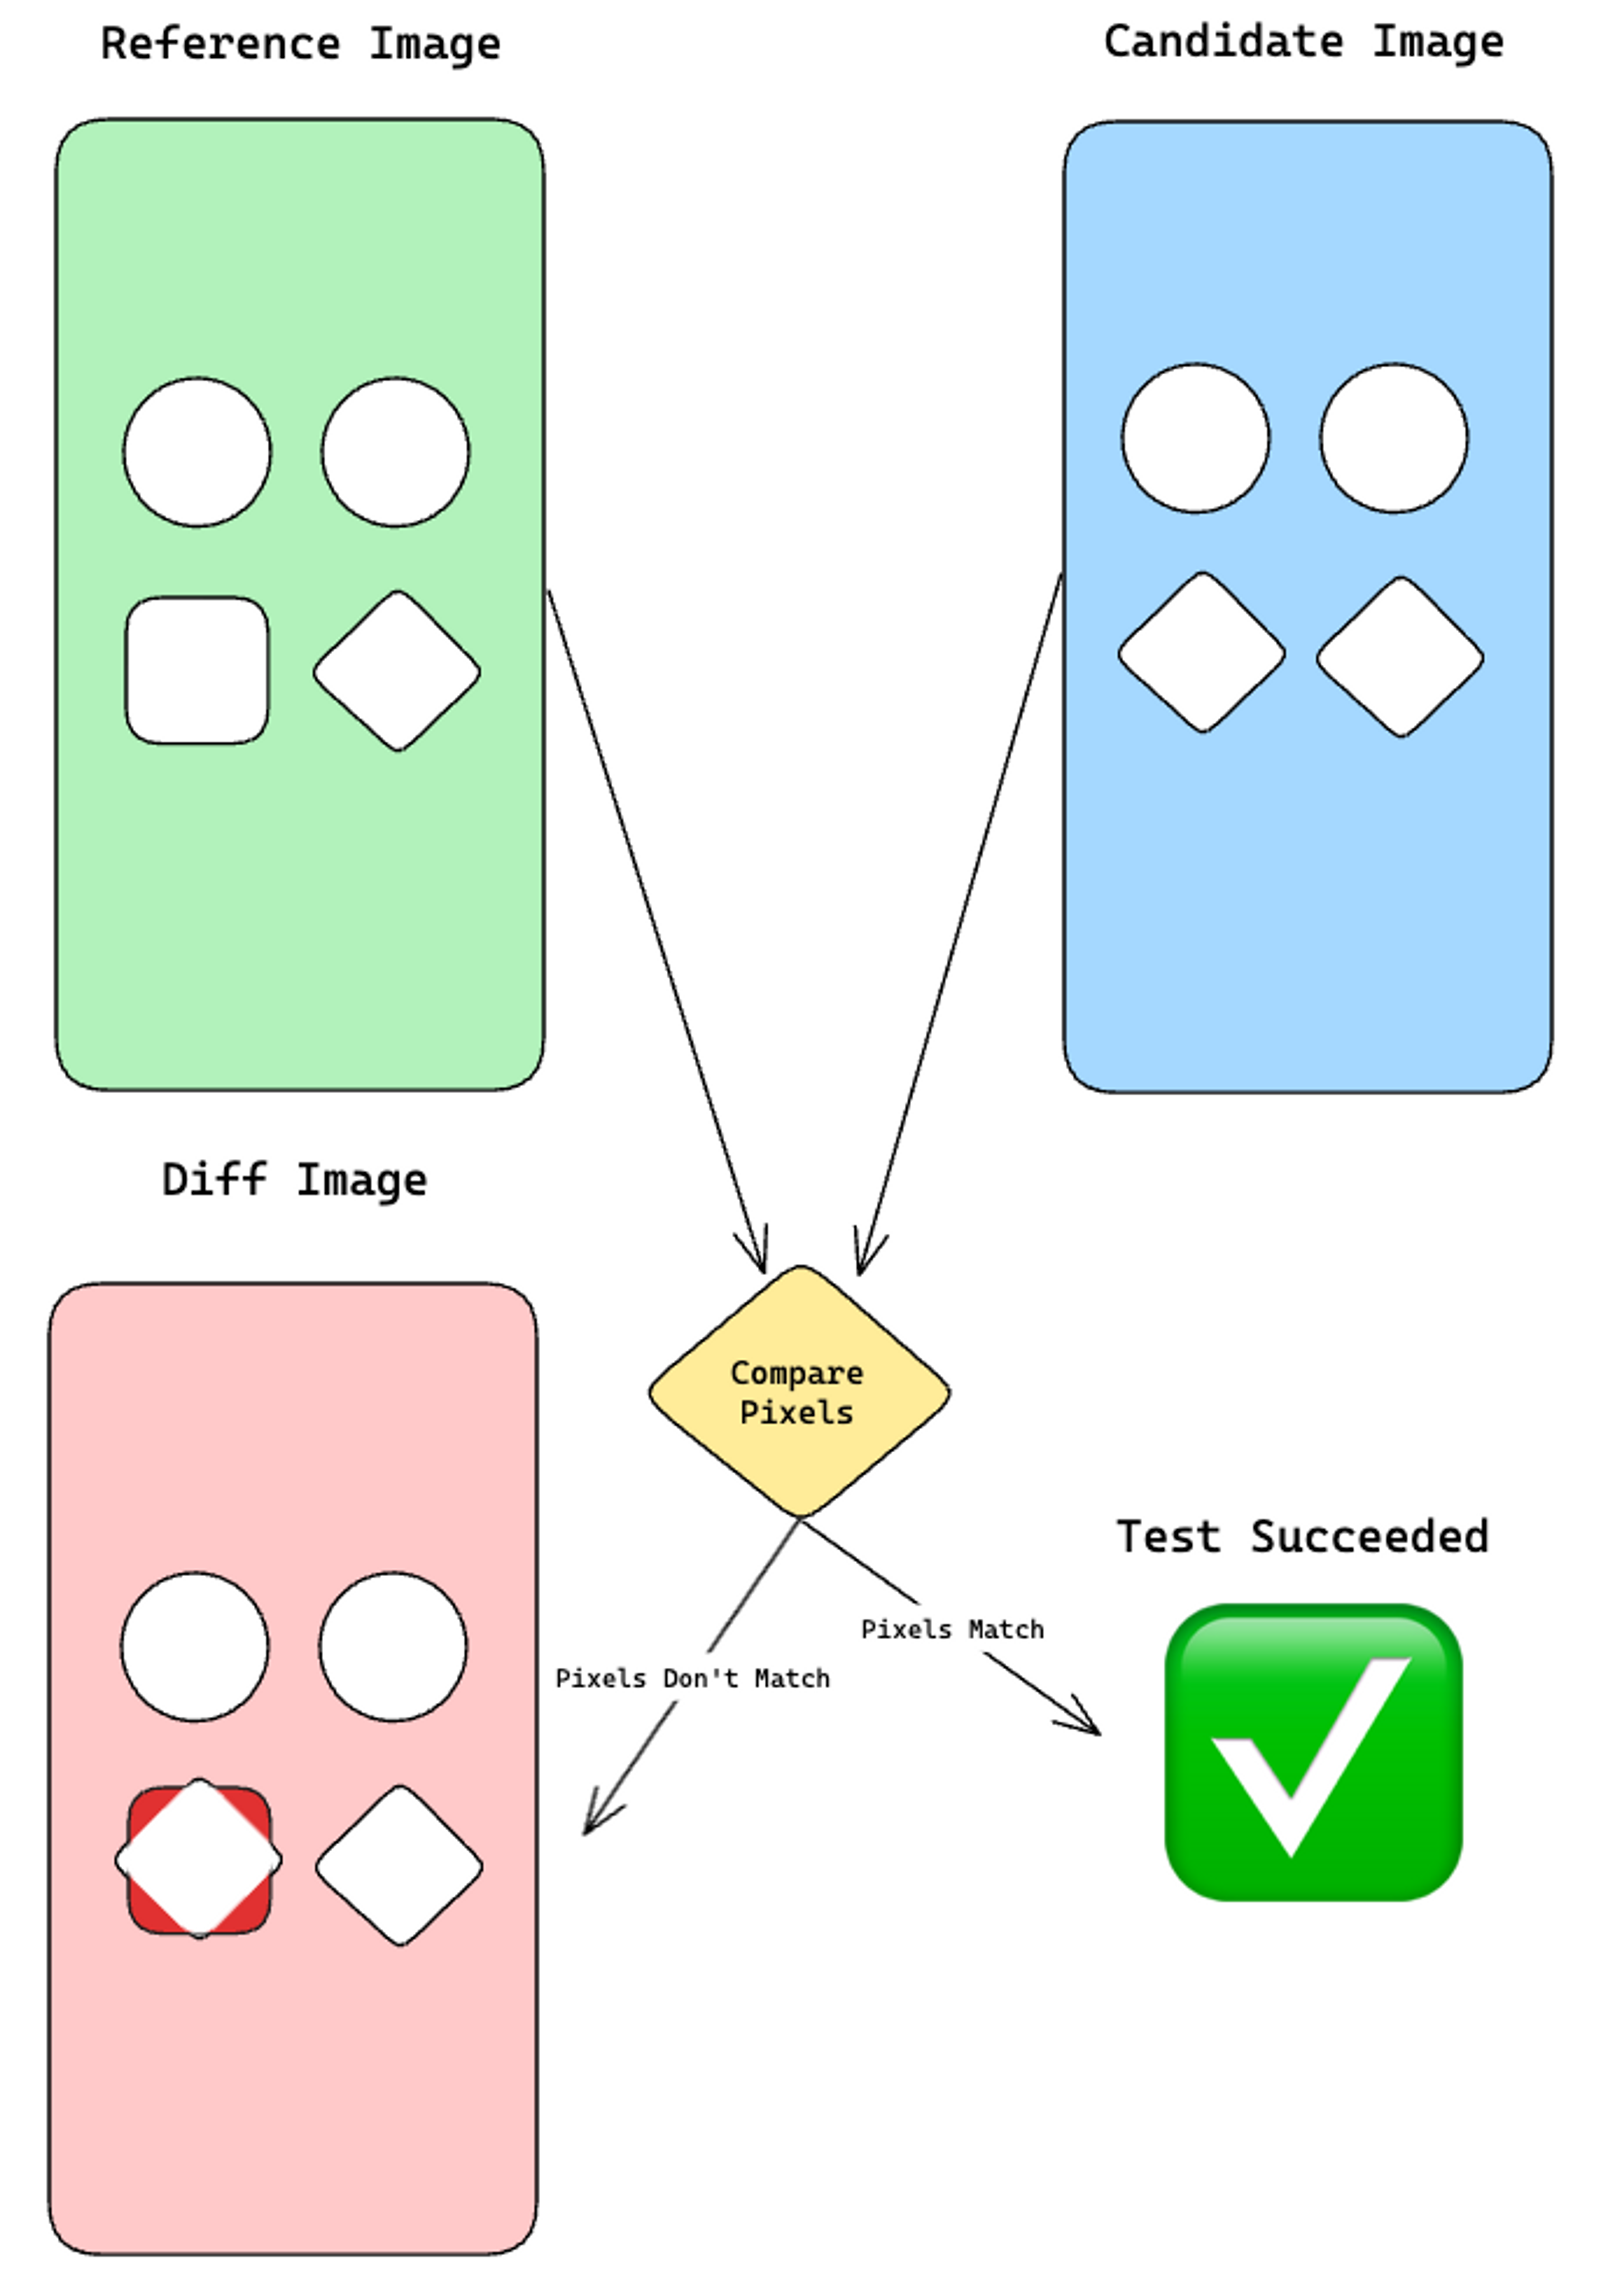
Diagram illustrating the snapshot test process
Why Snapshot Tests?
We use snapshot testing because neither unit nor UI tests do a good job in validating how the UI looks, which is a crucial component as the app’s UI is what users are seeing and interacting with. A unit test may be able to verify that a view contains certain colors, specific corner radius values, specific frame dimensions or certain constraint values. But writing a test like this for every view would be unruly because some views can get really complex, and inadvertent layout, color or font changes could easily be missed.
That said, UI tests out-of-the-box can only check if certain elements exist on the screen and that certain controls work as intended. UI tests can’t determine the spacing between elements, the color of elements, or if one element is placed above, below, left or right in relation to another element. Not to mention, XCUITests are notoriously slow, brittle, difficult to write, and difficult to maintain.
Issues With Point-Free SnapshotTesting
As previously mentioned, snapshot testing has long been part of Handshake’s testing philosophy. Like many, we have relied on Point-Free’s popular SnapshotTesting library, and while it is an effective library that enables us to engage in screenshot testing, there are several pain points that go often unspoken:
- Reference images need to be pushed to Git. The size of all these images can add up over time (although, we haven’t been forced to use Git LFS yet).
- Generating new reference images locally could be difficult. Oftentimes the Xcode version and simulator runtime used locally to generate the reference image needs to match the ones on CI, and it can take a while for the developer to figure out the specific configuration to use.
- Similar to the reason above, trying to run the snapshot tests locally usually fails because the reference images are tailored to the specific CI configuration.
- When snapshot tests fail on CI, generating an XCTestHTMLReport that contains the diff images is slow, increasing build times.
- Writing the tests is really redundant and boilerplate-y. Usually writing screenshot tests involves exact same lines of code that only differ in the actual name of the test.
Migrating to Emerge Tools
We have previously been using Emerge Tools to obtain app size and performance analysis, but their new snapshot testing capability sparked our interest. So, we decided to test it on our new Design System library.
Generally, a Design System is a great candidate for snapshot testing since it contains nothing but reusable, UI-only components. These components act as building blocks for screens in the app, so it’s essential that any visual regression in the Design System library is caught early. If an issue is introduced in the component library, that would cause regressions in multiple places throughout the app.
Emerge makes opting into their snapshot testing feature straightforward. And for us the transition was extremely simple since we had already written SwiftUI previews for all of our components. Once the snapshot testing capability was enabled for our organization, any time we upload an app into Emerge, that automatically triggers a snapshot collection. And when I say “automatic”, I mean that literally. During a snapshot run, Emerge scans our app looking for SwiftUI previews (e.g. types conforming to PreviewProvider) and generates a snapshot based on that preview. Zero lines of code related to snapshot testing were required for this to work. The snapshots could then be seen on the “Snapshots” tab on Emerge’s webpage:
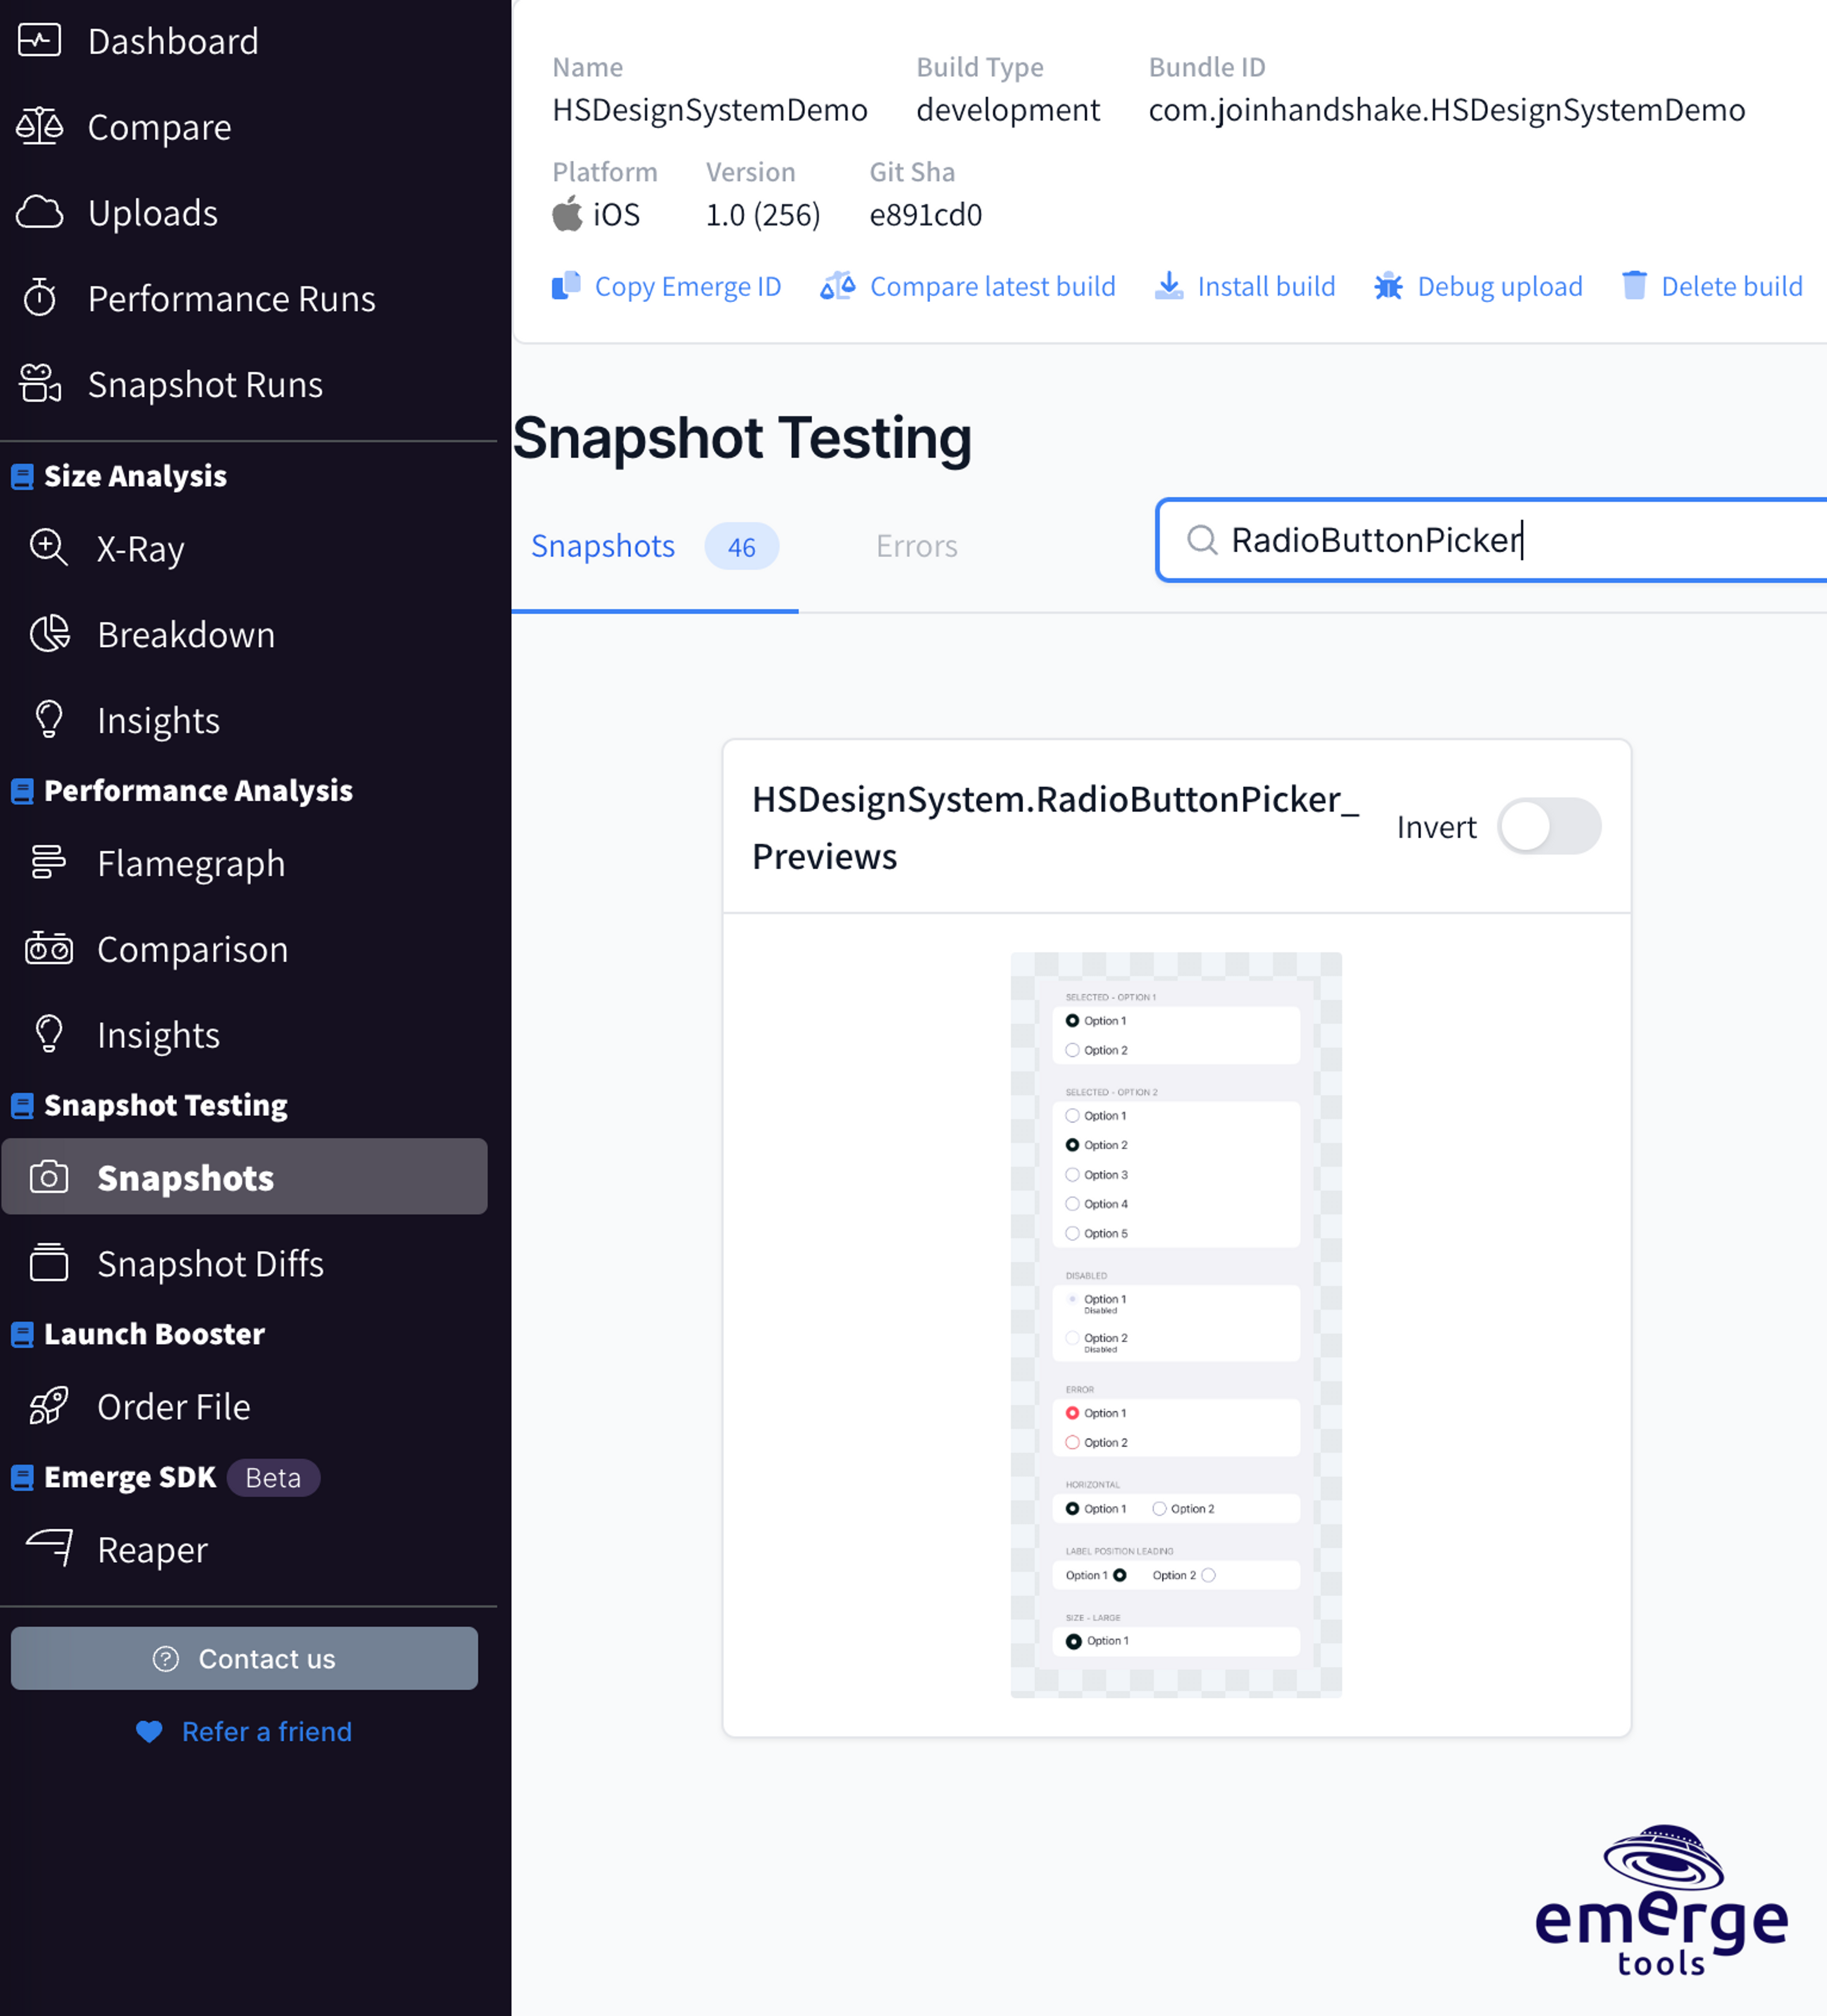
Screenshot of a snapshot test run that resulted from an app being uploaded to Emerge
Since our Design System was initially just a Swift Package, a couple steps of pre-work were needed in order to use Emerge’s snapshot testing feature:
- A test harness application needed to be created that linked in the Design System package, since Emerge requires an app to be uploaded.
- The CI scripts in our Design System repo needed to be updated to archive the test harness application in a Debug configuration and then upload the archive to Emerge. I used Emerge’s Fastlane plugin to make this easy:
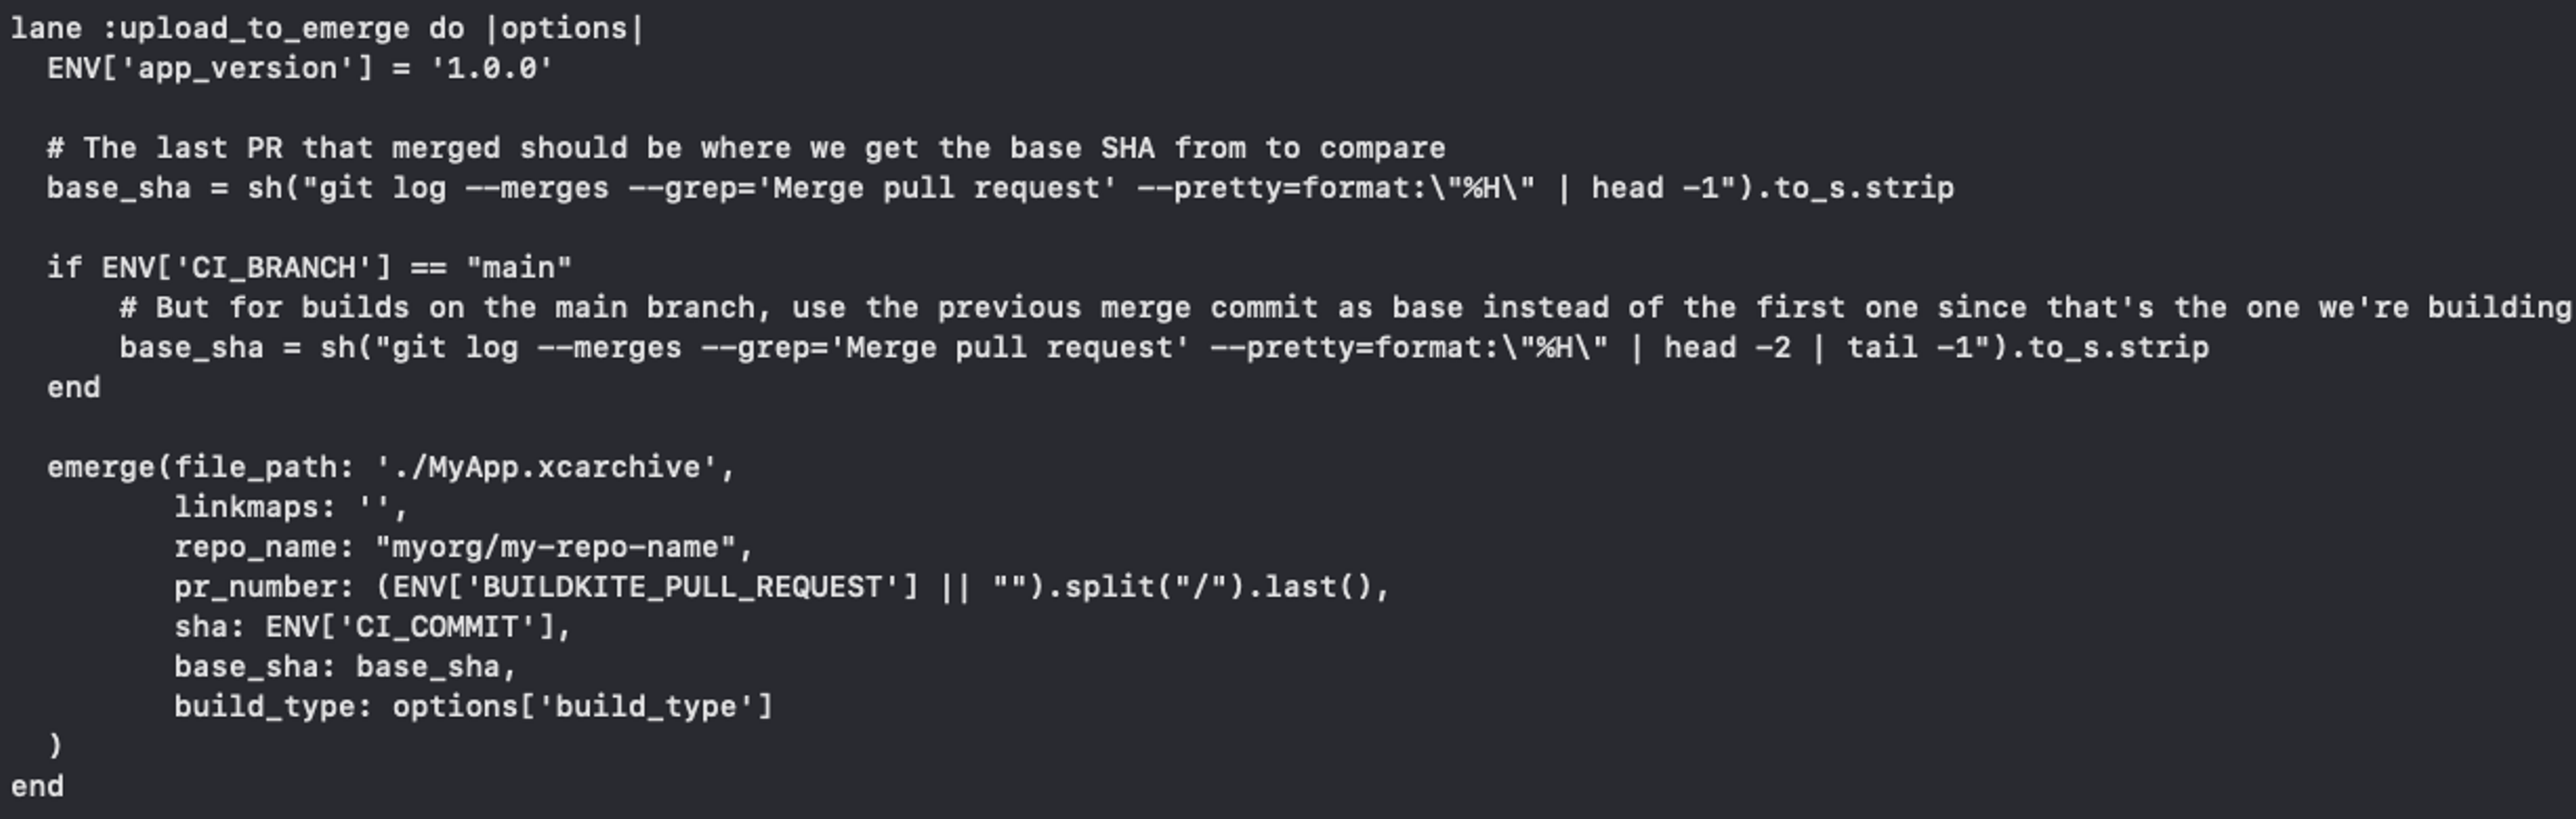
A Fastlane configuration that uploads the design system test harness app to Emerge for screenshot testing.
Emerge also collects snapshot diffs and is able to report a pass-or-fail status back to a pull request to let the developer know if there was any UI regression in the latest commit. The reference image used for the snapshot comparison is obtained from a previous Emerge snapshot run associated with the base commit SHA that we choose when uploading the app into Emerge. If a given snapshot test fails and the developer wants to find out why, all they need to do is click the link in the Emerge PR check to see the reference vs. candidate image comparison. And if the developer wants to update the reference image with the current candidate image, all they need to do is click the “Accept” button on the PR check.
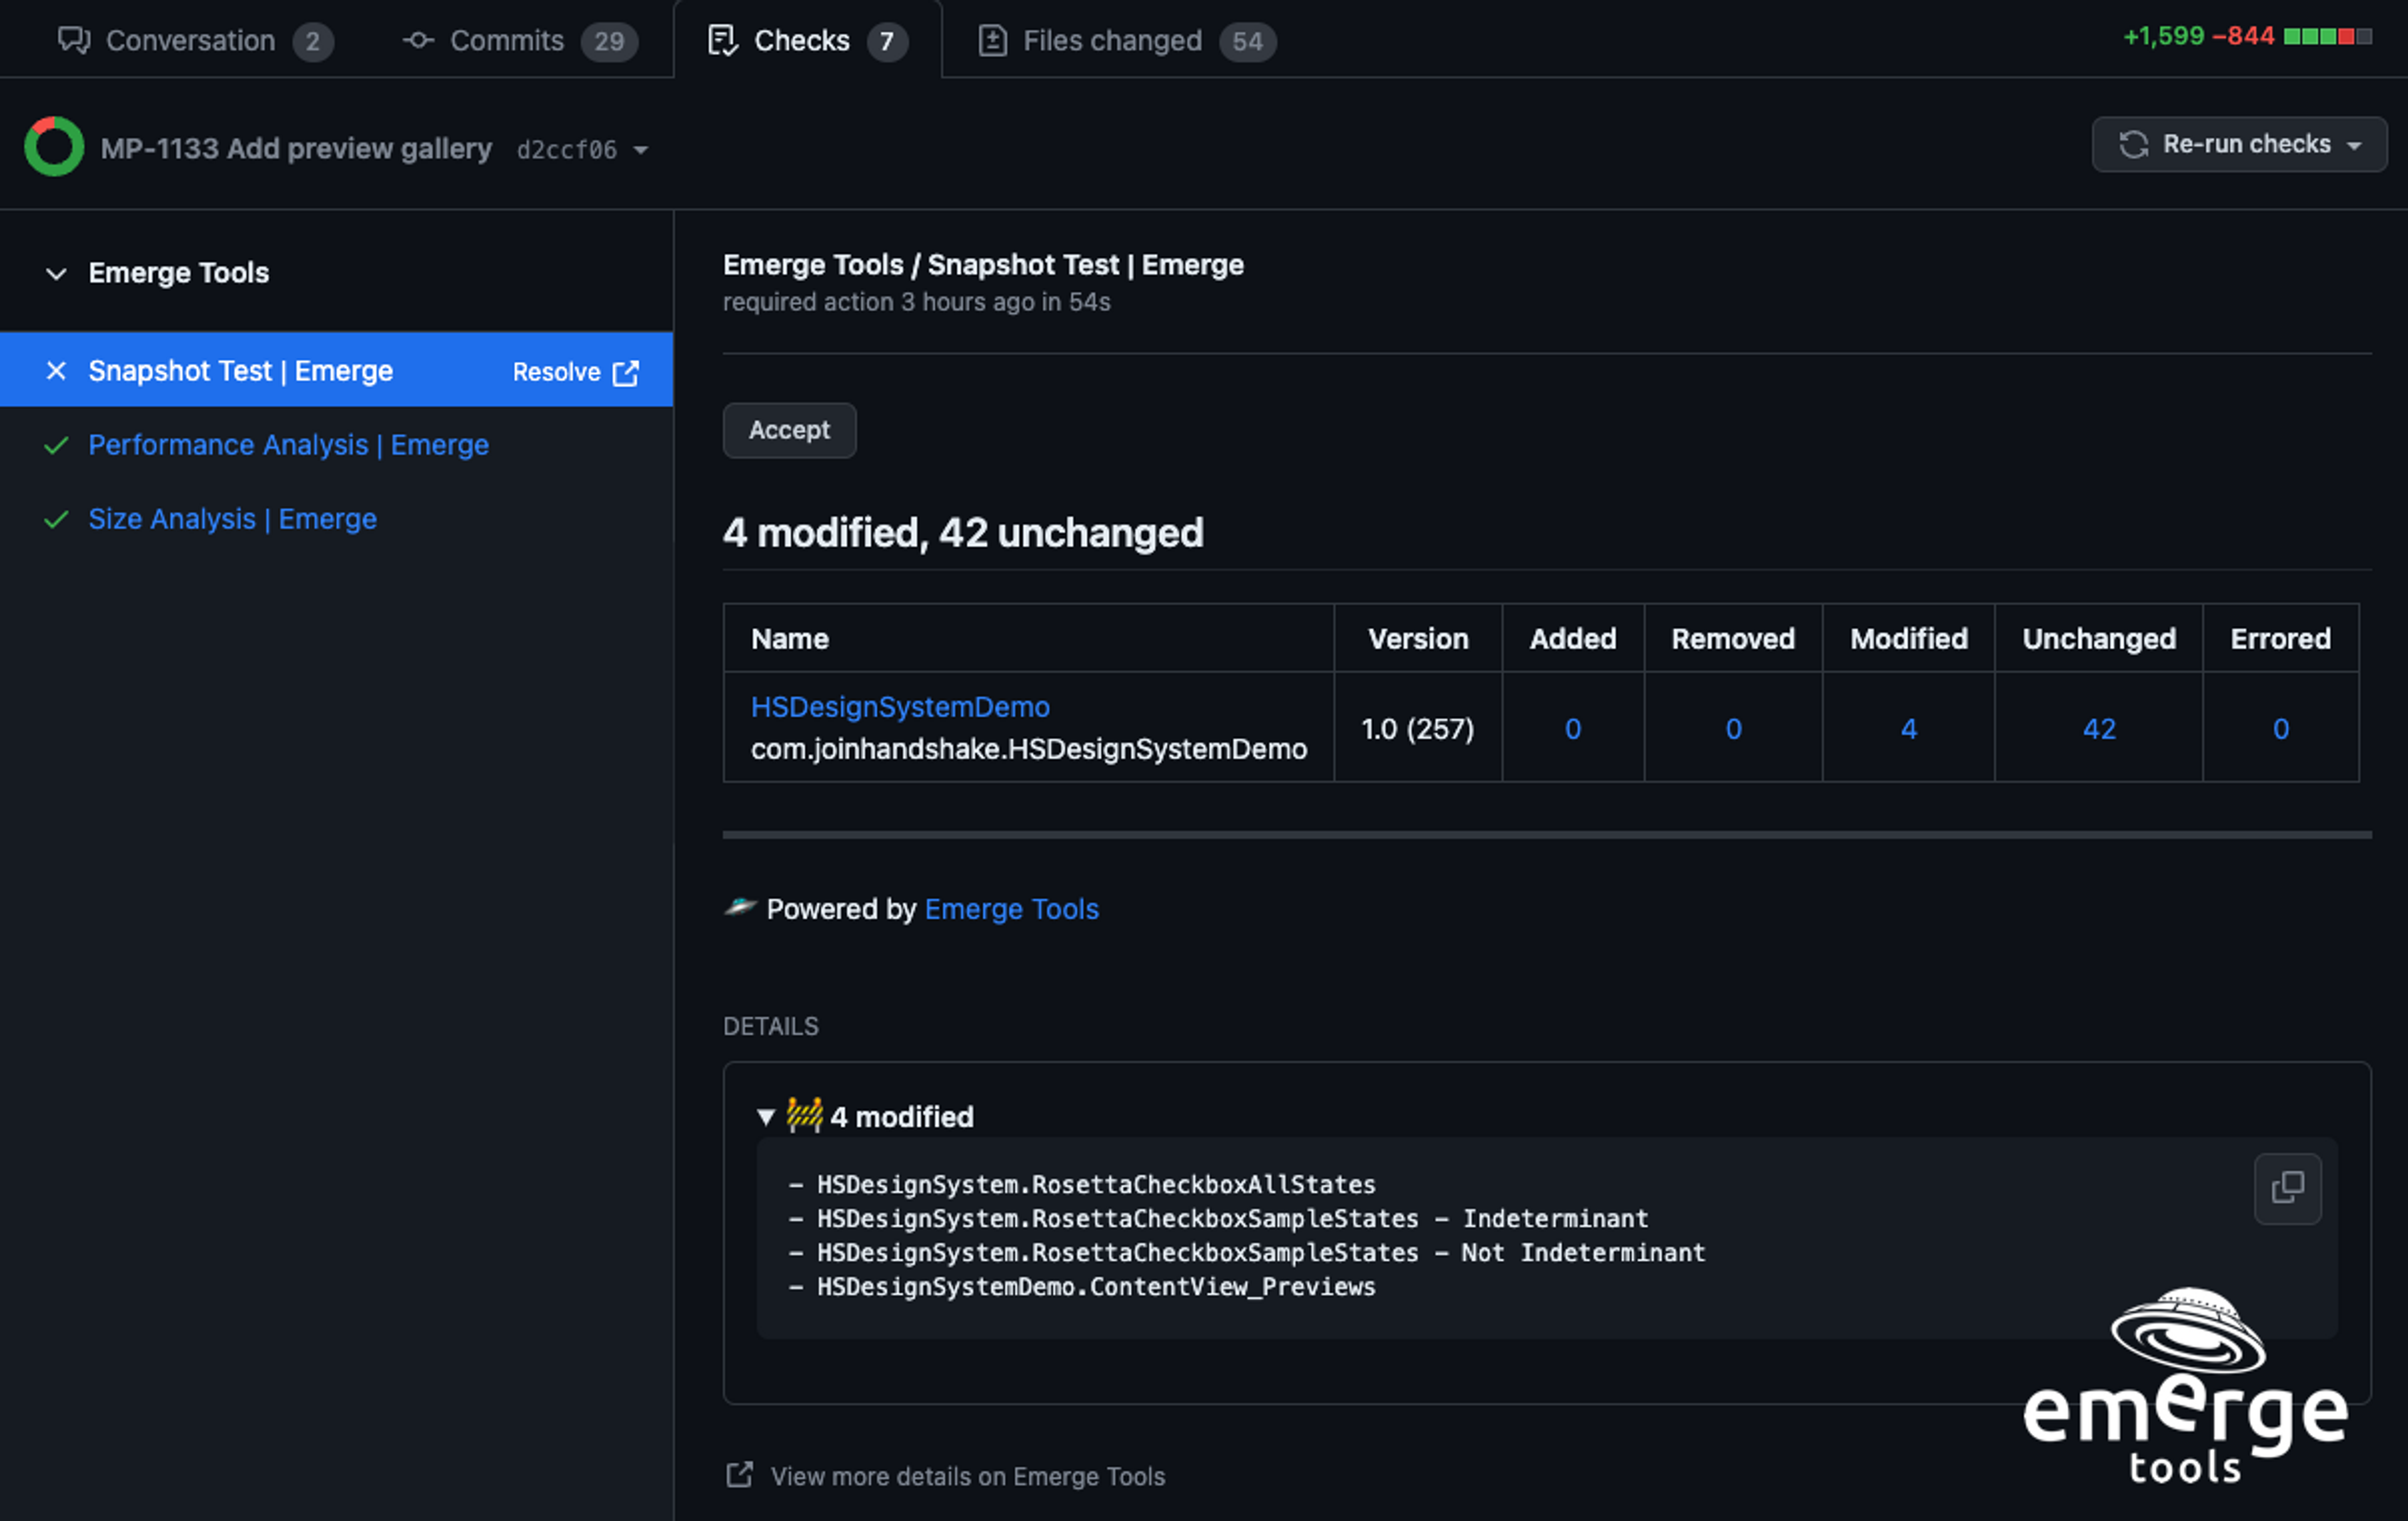
Screenshot of a failing Emerge snapshot PR check
Although Emerge handles all aspects of snapshot testing behind-the-scenes, they still give us an option to run snapshot tests locally. After I linked their SnapshotPreviews package into the Design System test harness application and created a single UI test that conforms to PreviewTest, when running the test conforming to PreviewTest, the SnapshotPreviews package automatically generated a new XCTestCase for each SwiftUI preview. If a failure does occur when running locally, as expected the reference and candidate images show up as XCTAttachements in the .xcresult corresponding to that test run.
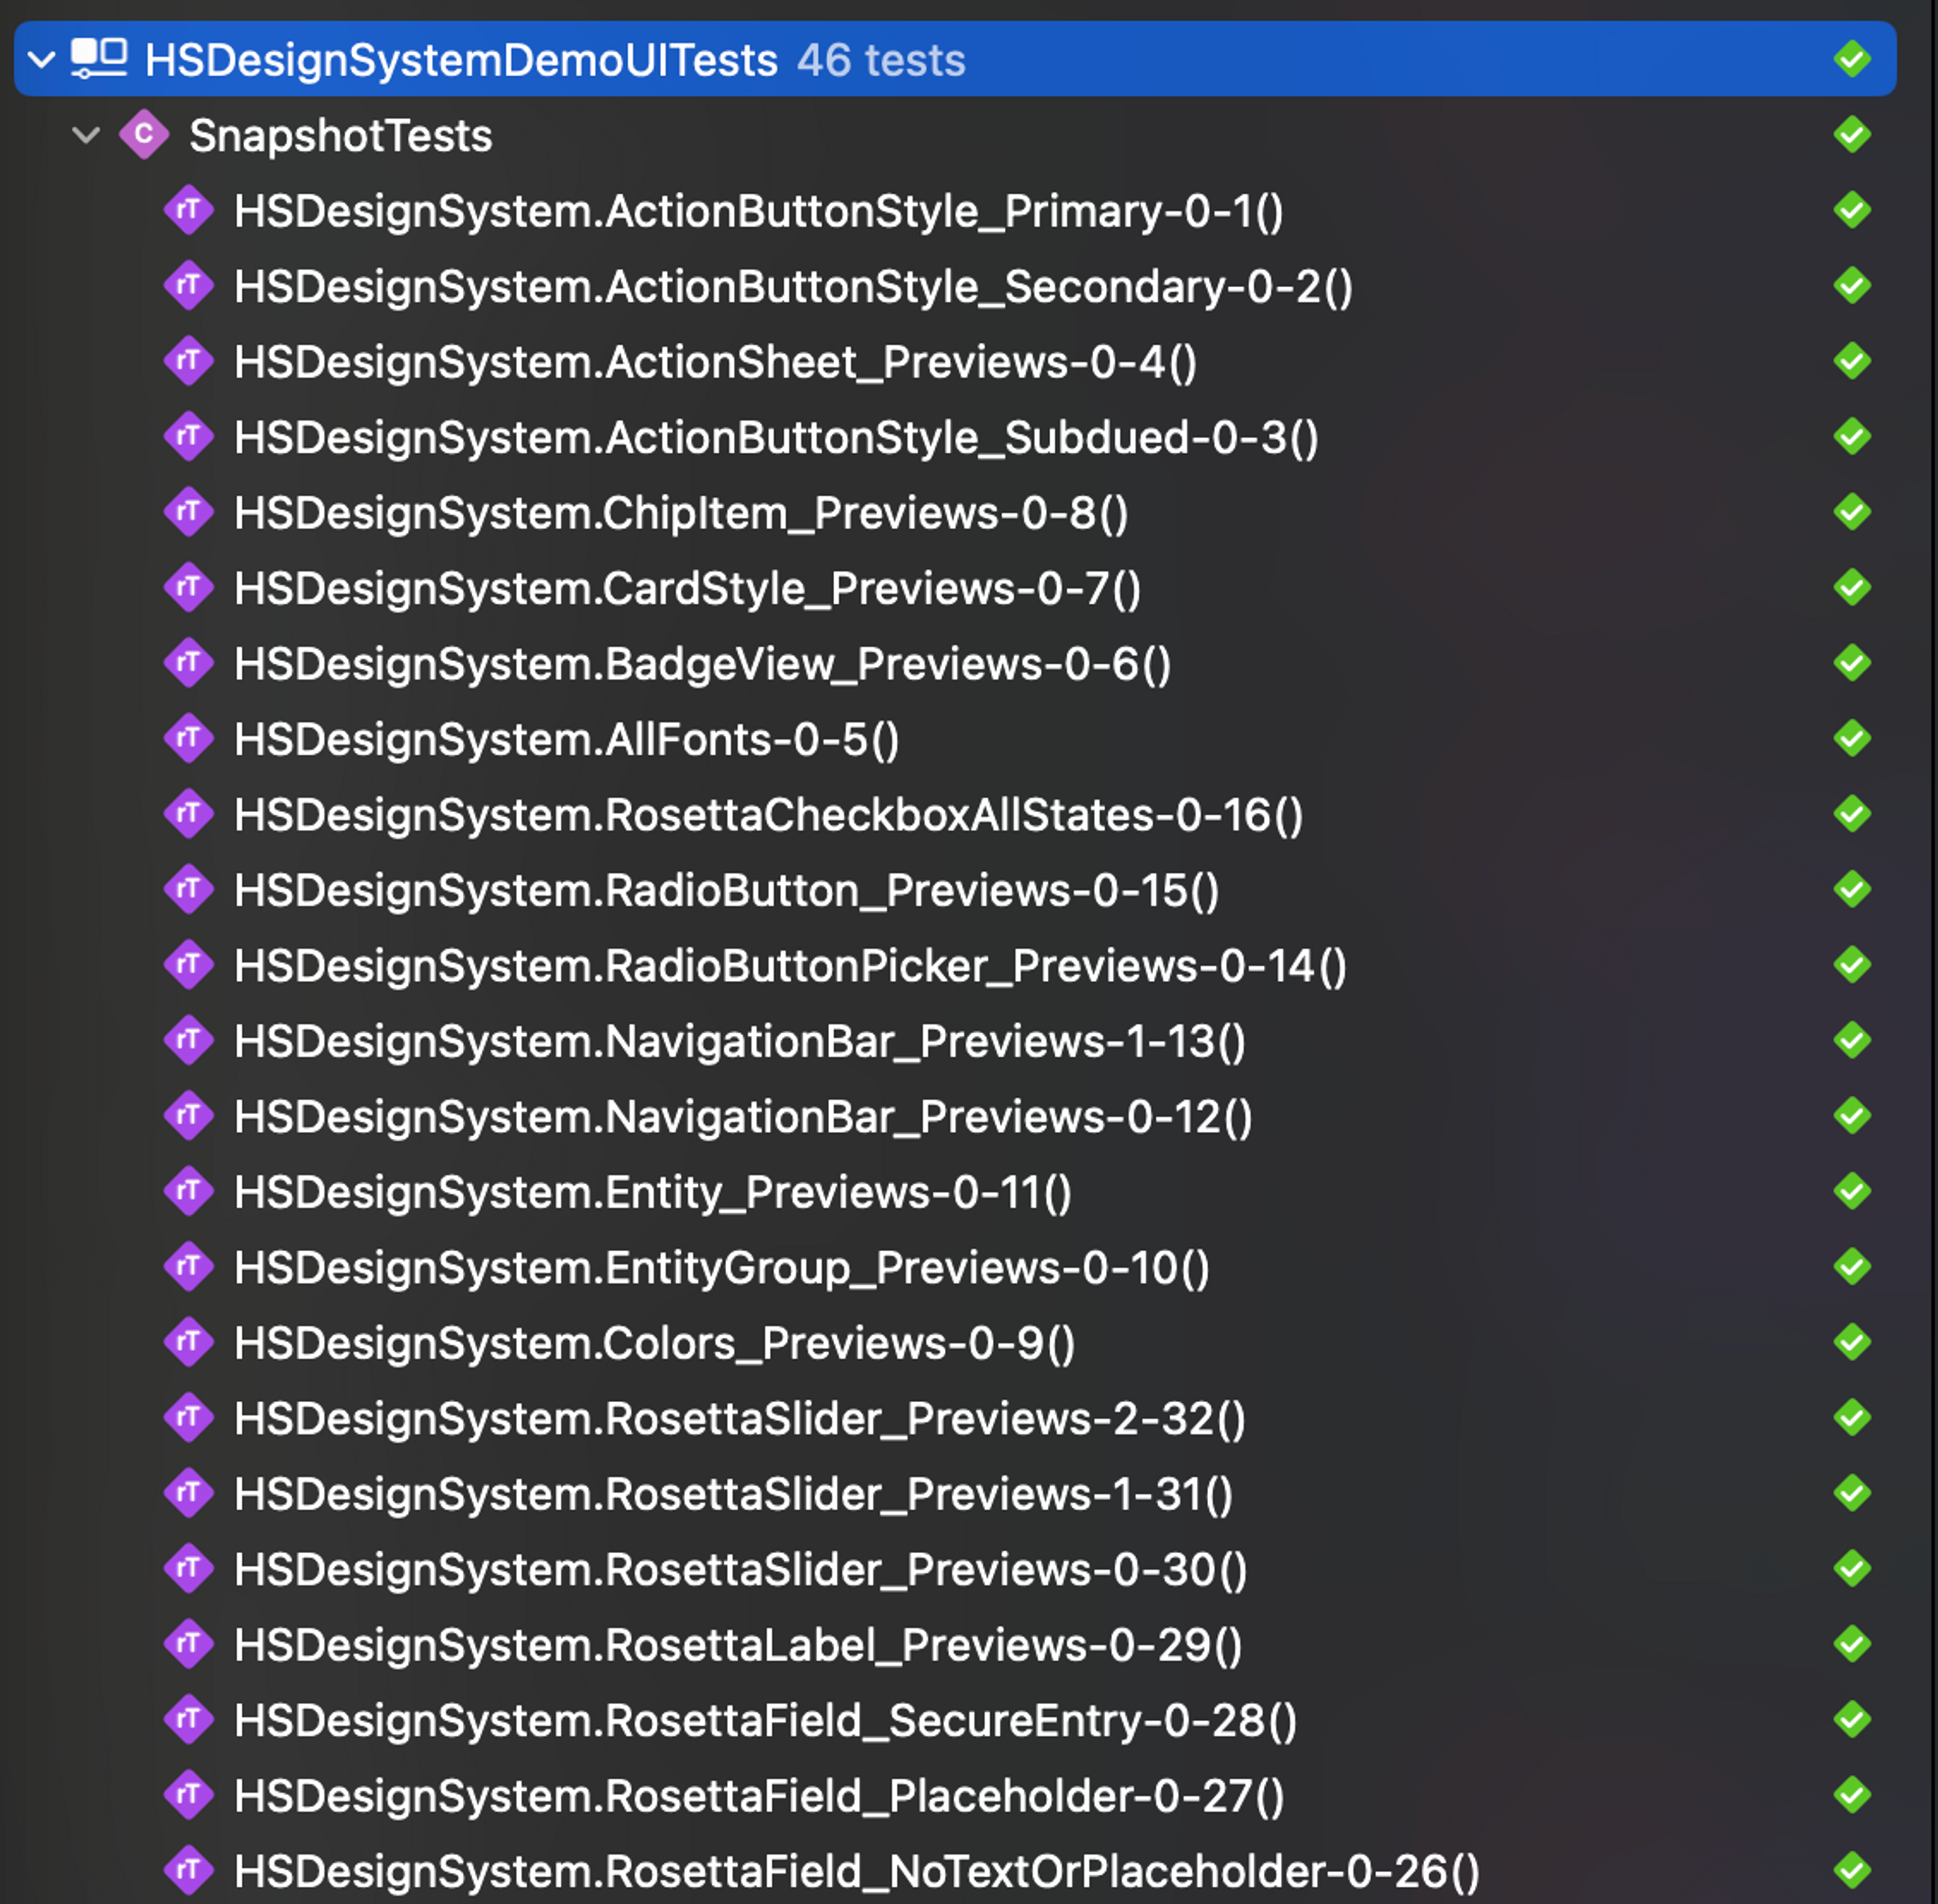
The SnapshotPreviews package from Emerge automatically generates XCTestCases
for you for the purposes of a given local test run
Another benefit of using the SnapshotPreviews package is it comes with a feature called the PreviewGallery, which will automatically generate a UI feature for you that allows one to manually view and interact with each preview in an organized, list-like format. For us, this was a significant game changer as we had been writing a separate set of code in our app’s hidden debug menu that demonstrated each component we had available. Now whenever we add a new component or modify it, those changes can reflect in our debug menu without us needing to write a single line of additional code.
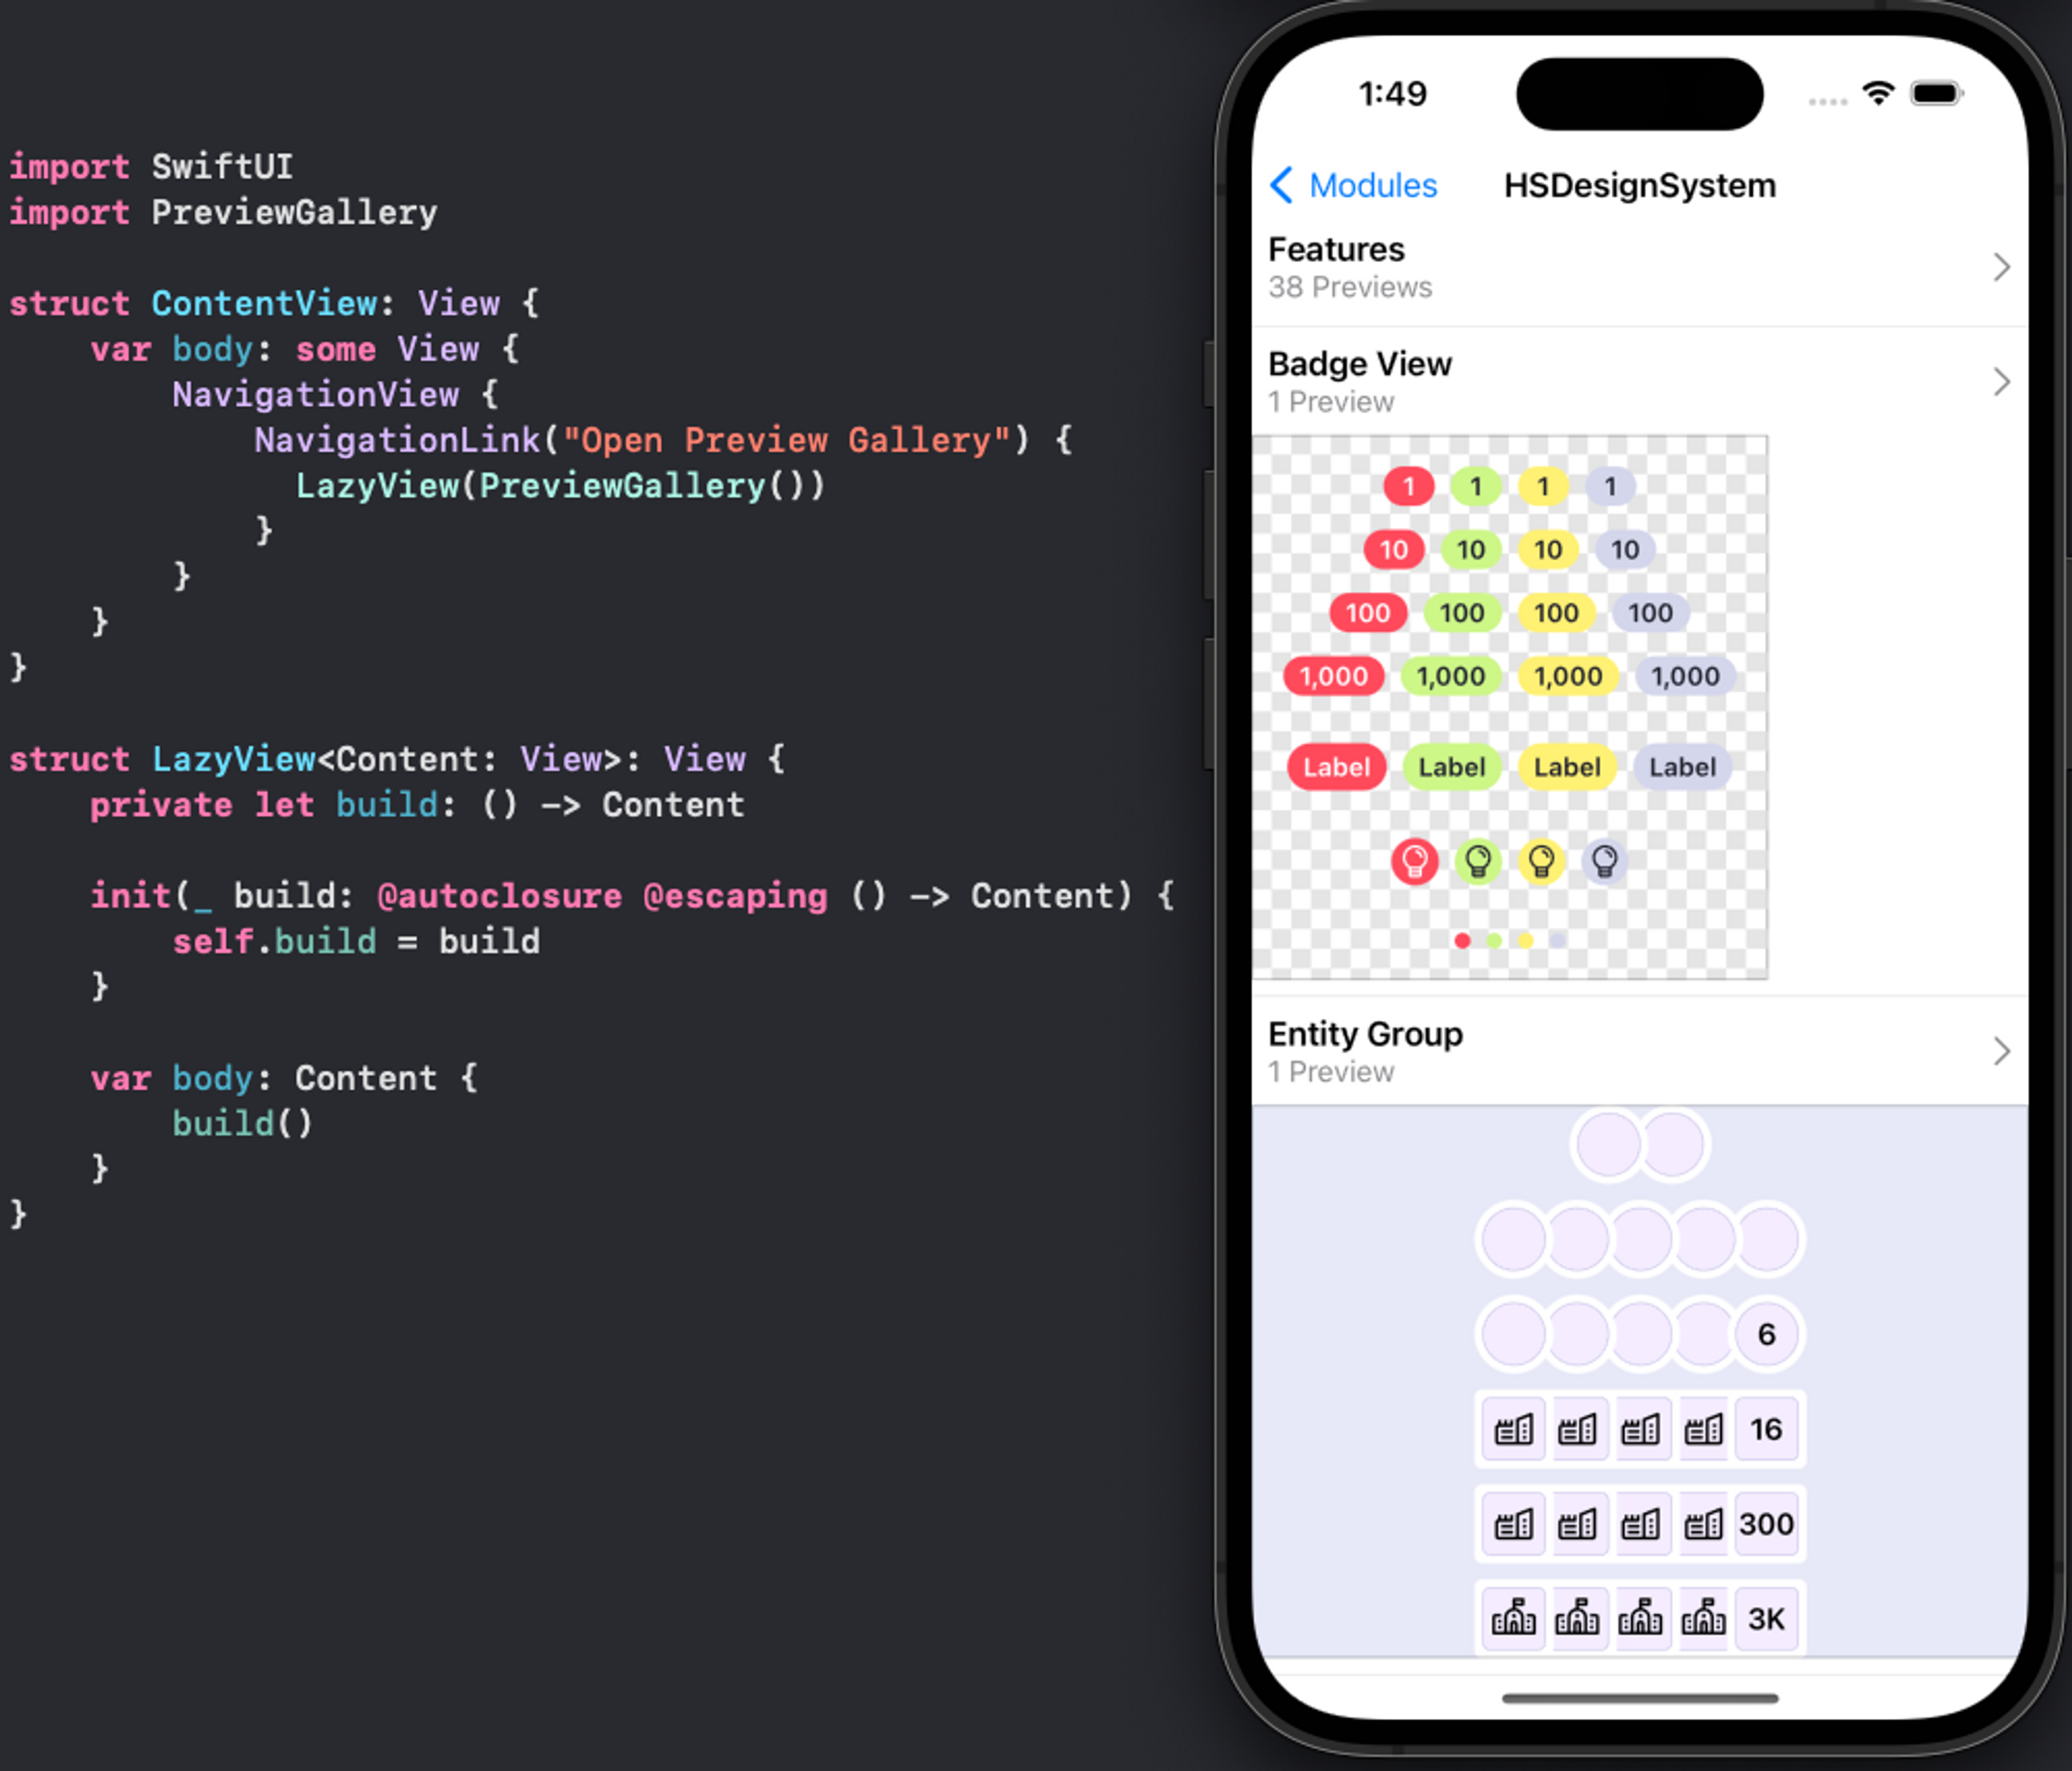
Using the PreviewGallery feature in Emerge’s SnapshotPreviews package to automatically display a menu of available components in the Design System
I was also pleased to see that running Emerge snapshots locally and on CI works with Xcode’s default code coverage reporting. However, Emerge also provides a .profdata file on their webpage with code coverage information in the event that a team does not leverage the SnapshotPreviews package. In order for the .profdata file to generate, I needed to add the following linker flags to the Design System test harness application:
- Other C Flags:
-fprofile-instr-generate, -fcoverage-mapping - Other C++ Flags:
-fprofile-instr-generate, -fcoverage-mapping - Other Linker Flags:
-fprofile-instr-generate - Other SwiftFlags:
-profile-generate -profile-coverage-mapping
Emerge Snapshot Testing Outcomes
After migrating our Design System to use Emerge’s snapshot testing capability, we were able to eliminate 721 lines of code from our test target. Additionally, by using the PreviewGallery feature of their SnapshotPreviews library, we were able to make 1,923 lines of demonstration code in our main app obsolete.
Furthermore, all five of the pain points with our previous implementation mentioned earlier were resolved with Emerge. Since Emerge keeps track of reference images based on the base commit SHA of previous uploads, developers no longer need to regenerate new images from their end. And the issue of redundancy in writing snapshot test cases has subsided since Emerge automatically generates those test cases now – so developers will no longer need to write another snapshot test case. Gone are the days of needing to know what version of Xcode and what simulator runtime were used to generate a reference image, because Emerge now internalizes that all on their end.
That being said, our team also uses a library called AccessibilitySnapshot, which builds on Point-Free’s SnapshotTesting implementation by taking snapshots of accessibility elements in the spirit of catching accessibility-related issues. We will continue to use a combination of Emerge’s solution along with AccessibilitySnapshot, until Emerge introduces their own accessibility snapshotting capability (which they’re working on)!
Overall, Emerge snapshot testing has helped our team move more efficiently, while retaining our existing testing methodology and our high standards of quality.
Thanks to: Noah Martin and Itay Brenner from Emerge Tools for their assistance in getting their snapshot testing implementation set up in our project.
Photo Credit: Luis Quintero on Pexels